The Complete Newbie Guide to Summoner's War
Updated as of 11-20-2015
---AN: If you see an error whether it’s in content, context, or spelling please inform me. While I try to be as thorough as possible, every guide takes a lot of time and a lot of effort both of which are scarce.
Welcome to Summoner's War! If you're reading this, you're new and want to get started on the right foot. Though bigger and more in-depth guides exist, this should give you everything you need to get started.
Have any questions not addressed here? Post them below or go online and ask in the channels. If you’re looking for me, ask for Serefina in Channel 131 on Global. I’m almost always around, and if not there are plenty of helpful people there!
Foreign Language Channels:
9000 - Portuguese
555- Spanish
666 and 667: French
Purpose
The purpose of this guide is to answer some of the most common questions and topics new players have about the game and to provide them a framework to succeed quickly and efficiently. As a result this guide only addresses easily obtainable monsters.
Table of Contents
Daily Must Do’s & Events [A00]
Monthly Events [A01]
The Lingo (Aka. What Does that Mean?)
[A11]What Monsters Should I Keep? [A21]
All About Runes [A31]
Fodder Leveling (Aka. How Do I Level Up Fast?) [A41]
Where Should I Level? [A42]
Arena 101 [A51]
What Should My Arena Team Be? [A52]
Getting Started With Guild War [A61]
What are Guild War Points and Guild War Point Farming? [A62]
Giants, and Dragons, and Liches Oh My! [A71] ---WIP
Intro to ToA & Rift [A80] ---WIP
Leveling Guide [A81]
Elementary Fusion [A82] --- WIP
Frequently Asked Questions (FAQ) [A90]
To Navigate: Press Ctrl + F to open Search and input the code in brackets.
Additional Resources
Ultimate Directory of SW Resources (this link was too long)
Dungeons, Exp Tables, & More- http://summonerswar.wikia.com/
How to Power Up Runes- http://summonerswarskyarena.info/rune-guide-for-beginners/
Monster Rune Build Guide: http://forum.com2us.com/forum/main-forum/summoner-s-war/guides-and-tips-ac/53254-monster-rating-compilation-rune-build-included
Monster Skills, Builds, and New Monsters- http://summonerswarskyarena.info/monster-list/\
While not the most thorough guide, they are more active in updating than I am and provide a good starting idea of how to build your monsters.
Complete List of Buffs and Debuffs- http://summonerswar.zenira.com/guides/buffs_debuffs.php
Daily Must Do’s & Events [A00]
For the savvy summoner, there are a few things that are worse to miss than Daily Rewards and Events!
As of sometime in March 2015, Hall of Heros (HoH), Special Secret Dungeons (SSD), and Free Rune Removals, have been implemented to make game-play easier and more fun for everyone!
Your first stop to a successful start? Doing your Daily Missions!
Found under the missions tab on your main screen (where you see your island), completing these missions can get you up to 10 crystals daily! When combined with your Arena Rivals (20 crystals at most), you can get a total of 30 crystals daily! Isn’t that awesome?
Daily Rewards
A Summoner’s Duty
· Summon Monsters 3 times – Reward: 300 mana and 50xp
Come Back When You’re Ready
· Power-up any Monster 3 times – Reward: 500 mana and 50xp
Daily Rune Maintenance
· Power-up Runes 3 times (failure counts)– Reward: 500 mana and 50xp
Building friendship
· Send Social Points to a Friend 5 times – Reward: 3 Arena Invites and 50xp
Show off your friendship
· Use your friend’s monster in battle by selecting from the bottom of the screen – Reward: 300 mana and 50xp
Giant Killer
· Clear the Dungeon of Giants – Reward: 750 mana and 100xp
Gathering Magical Powers
· Clear the Dungeon of Magic – Reward: 750 mana and 100xp
Head to Head
· Fight in the Arena 3 times – Reward: 10 energy and 50xp
Let’s go for another round!
· Use 20 Energy – Reward: 3 crystals and 50xp
Conqueror of (Water/Fire/Wind/Light/Dark)
· Clear whatever the Daily Dungeon is – Reward: 750 mana and 100xp
Complete Your Missions
· Clear All Daily Missions – Reward: 7 crystals and 200xp
Log in Daily
· Do nothing, if you see it, you’ve done it- Reward: 3 Dimensional Rifts and 50xp
Monthly Events [A01]
As of current date there are three reoccurring events that will help you grow as summoners.
They are:

The Hall of Heroes (HOH)
Occurring every second Friday of the new month through the weekend, this event allows players the opportunity to get a 4* Natural monsters by collecting pieces much like an SD. It is EXTREMELY RECOMMENDED that you complete this if you are able as it is very, very helpful.
Contrary to what ANYONE will tell you, HOH monsters are all viable fighters and useable units and do not have to be used as “skill ups” for other monsters (they should never be used as food unless it is for skill ups as they may be used in fusions or receive upgraded skills in the future).
Starting Day Exceptions
Com2us is a bit weird in how they define the month start. Iif the first day of the month was on or before Wednesday, you’ll get the HoH on the 2nd Friday, if it wasn’t, it is on the 3rd Friday of the month.
How HOH Works
HOH runs on a recurring cycle of elements. The first HOH is always Light, Dark, Wind, and Water, followed by Fire. Sadly (or fortunately), HOH does not repeat monsters of the same type, so if you missed one monster of an element, you’ll never see a HOH for any of their elements.
As of 2/1/2016 HOH now may repeat monsters that have been previously done in a different element. Given the advent of the Dark Undine HoH, it may be assumed that the first two-waves are most likely to be repeated, making Yen (wind Rakasha) a distinct possibility for the March 2016 HOH.
B1- Gives you a chance of getting 1 piece of a monster or just a lot of mana.
B2- Guarantees 1 piece but requires a 5-6* monster team with good 5* or higher runes
B3- Guarantees 1-4 pieces of a monster and requires a full 6* team with amazing runes.
As a general rule, a lvl 20 or higher summoner with a solid 4 and 5* team featuring good 3 and 4* runes will be able to complete B1.
Past HOH Include:
Available only in Korea
Gin (Light Ninja)> Luna (Dark Pierette)
Available in Global and any added servers (by virtue of switching from Global)
Delphoi (Wind Undine) > Su (Water Rakasha) > Shihwa (Fire Nintetails)> Aria (Light Succubus)> Guillame (Dark Phantom Thief)
Acasis (Wind Sylphid) > Lisel (Water Vampire) > Hong Hua (Fire Kung Fu Girl)> Eredas (Light Sylph)> Diaz (Dark Death Knight)
Taurus (Wind Kobold)> Kaz (Water Samurai)> Draco (Fire Brownie)>Brig (Light Pirate) >Lannett (Dark Magical Knight)
Cichild (Wind Mermaid) >Ryan (Water Neostone Fighter)> Sutur (Fire Barbarian King)> Conrad (Light Death Knight)> Tilasha (Dark Undine)
For more on HOH see: http://summonerswar.wikia.com/wiki/Hall_of_Heroes
HOH Team Structures
Though your monsters will greatly vary, like a giants team, teams that successfully complete HOH often have a few essential elements.
At low levels your very first HOH team will probably lmake sure of whatever your best monsters are plus your best support. As a result it will likely look something like this:
Water Fairy + Water Garuda + Wind Griffin + Water Lizardman+ Water Magic KnightOR
Healer x2 + Speed Buffer + Dot or Nuker + CC or Damage Reducer
You are especially likely to need Water Garuda (Konamiya) as HOH often have bombers or Dot dealers that are likely to wipe out your team.
The general idea is to rely on a steady amount of heals and buffs to keep your team alive while you can lay down dots or nuke enemies one by one.
For B2 and B3 teams often are composed of a reviver with various support and a main damage dealer. Units are often entirely 6* with 5 or 6* runes. Healers are violent with over 150 speed. They teams often look like this:
Veromos + Belladeon + Mikene + Theomars + Bernard/Konamiya/Baretta
or
CC + Healer + Reviver + Dot or Nuker + Speed buffer or a Second Healer or Cleanser or DOT/CC

Free Rune Removal Day
Occurring every first Saturday of the month, players are allowed to remove runes without paying any mana cost as a penalty. This is probably the most anticipated time for end-game users, so if you need rune advice, ask for it well in advance!
Special Secret Dungeons
Likely to fund the cost of all those rune upgrades that happen on Removal Day, a special 3* secret dungeon is offered starting the Friday before Removal Day and running through the weekend.
There is also usually a special 7 day 3* Secret Dungeon 2 weeks prior to Removal Day starting on a Friday.
Seasonal Events
Generously, Com2us will usually offer seasonal events around U.S national holidays on the Global server which offer opportunities to gain mystical crystals, mana, energy, devilmon, rainbowmon, and sometimes even special event-only monsters such as ‘Fairy Queen or Dark Cowgirl, they also may offer event-special items such as the December 2014 Christmas Ellia.
 |
| Christmas Ellia 2014 Reward |
The Lingo (Aka. What Does that Mean?) [A11]
AD - Arena Defense
AO- Arena Offense
AOE- Area of Effect; Attacks that hit all monsters
Buff- Positive Status Effect (ie. Stat Boosts)
De-Buff – Negative Status Effects; can also refer to removal of positive status effects.
DOT- Damage Over Time
Food/Fodder – Monsters used to evolve or increase the skills of other monsters.
M Scroll- Mystical Scroll
Nuke- Offensive strategy of attacking hard and fast; also refers to high attack monsters.
PVP- Player verses Player; in this case, arena.
PVE- Player verses Environment; in this case, dungeons.
SD- Secret Dungeon; Dungeons obtained randomly while doing elemental Halls in Cairos. Collect all the pieces to summon. At least 1 piece guaranteed after Stage 3.
Tank – Strategy of out-lasting opponents due to high defense or hp; also refers to high defense or hp monsters.
ToA- Tower of Ascension
U Scroll – Uncommon Scroll
Note: Throughout this guide you will notice I do not refer to monsters by their game defined types, but rather by how I’ve seen most players use them or build them.
What Monsters Should I Keep? [A21]
Since this is a guide for new players, I won't address 4* or 5* Natural monsters with the exception of those given out as rewards. Every natural 4* and 5* is arguably good though some are easier and more versatile to use than others. If you are, however, one of the devilishly lucky newbies who net yourself a 4* or 5* monster, please check out the Monster Ratings & Rankings guide linked above.
For everyone else, continue on....
So, what is the creme de la creme of the 2 and 3* monster world?
Below is table highlighting some of the most used 2 and 3* monsters you never knew were worthy of keeping until the end of time!
Top Tier Natural 2 & 3 Star Monsters |
|||||
Monster (Awakened Name) |
Star Grade |
Role |
Rune Build (Slot 2,4,6) |
Obtainable From |
Remarks |
| Wind Pixie (Shannon) | 2 | Support | Swift + Energy/Focus (SPD, HP%, HP%) Despair+ Energy (SPD, HP%,ACC%) | Uncommon Scroll Secret Dungeon Shop | An excellent buffer and debuffer, Shannon plays a central role in teams for Giants, Dragons, ToA, and even Arena with her attack and defense boosts. |
| Fire HellHound (Sieq) | 2 | Attack | Fatal + Blade (ATK/ATK/ATK) Swift + Energy (SPD/HP%/HP%) | Uncommon Scroll Shop | Used initially as a damage dealer, Sieq is a popular end-game choice for a crit rate and attack buffer. Fatal for attacker Sieqs, swift for buffer Sieqs. |
| Light Garuda (Teon) | 2 | Support | Swift + Energy (SPD/HP%/HP%) | L & D Scroll Game Start | With Resurge and the ability to heal or revive, Teon is one of the most under-appreciated 2*. Formidable in Guild War and Arena, Teon is excellent support and a great secondary healer. |
| Water Garuda (Konamiya) | 2 | Support | Swift + Energy (SPD/HP%/HP%) | Uncommon Scroll Secret Dungeon Shop | Resurge and Peace make this bird invaluable in teams needing healing from negative debuffs. A key member in late game Dragons and ToA teams. |
| Wind Warbear (Ragamos) | 2 | Attack | Energy (HP%/HP%/HP%) | Uncommon Scroll Secret Dungeon Shop | Useful against bosses, in dungeons, and against tanky opponents like Epikon Priest, Ragamos' Cleanshot can easily do over 20k damage. |
| Light Vagabond (Darion) | 2 | Defense | Energy (HP%/HP%/HP%) Violent + Revenge (HP%/HP%/HP%) | Secret Dungeon L&D Scroll | A central part of most late game arena defense; Darion helps keep teams alive even against Giants. |
| Water Howl (Lulu) | 2 | Support | Swift + Energy (SPD/HP%/HP%) | Uncommon Scroll Secret Dungeon Shop | With frequent heals and debuff removal, Lulu quickly replaces Water Fairy as a primary healer. |
| Light Howl (Shushu) | 2 | Support | Swift + Energy (SPD/HP%/HP%) | Secret Dungeon L&D Scroll | Like Lulu but with stronger heals. |
| Fire Harpu (Colleen) | 3 | Support | Swift + Energy (SPD/HP%/HP%) | Uncommon Scroll Secret Dungeon Shop | Most used in Necro and Rift Raids. Useful for heal block, AOE heal, and AOE attack buff. |
| Fire Griffin (Spectra) | 2 | Support | Swift + Focus/Energy (SPD/HP%/HP%) | Uncommon Scroll Mystical Scroll Secret Dungeon | Primarily and end-game monster, Spectra is a staple of Toa Hard and Dragons B10 teams with his attack bar decrease and AOE speed debuff. |
| Wind Griffin (Bernard) | 3 | Support | Swift + Focus/Energy (SPD/HP%/HP%) | Uncommon Scroll Mystical Scroll Tamor | One of the best speed buffers in game, Bernard is an integral part of Giants teams and great in Arena too. |
| Fire Mystical Witch (Rebecca) | 3 | Support | Swift + Focus/Energy (SPD/HP%/ACC%) | Uncommon Scroll Mystical Scroll | One of the most under-appreciated monsters, Rebecca's AOE defense break, party cleanse, and heal make her excellent support end game. |
| Water Mystical Witch (Megan) | 3 | Support | Swift + Focus/Energy (SPD/HP%/ACC%) | Uncommon Scroll Mystical Scroll | Offering a bigger attack boost than Shannon and capable of blocking buffs, Megan is useful in both arena and dungeons. |
| Fire Inugami (Raoq) | 3 | Attack | Swift/Fatal + Energy/Blade (Spd/Atk%/Atk%) | Uncommon Scroll Mystical Scroll Faimon | A powerful attacker, Roaq is useful everywhere and can even solo dungeons when built with Vampire Runes. Can be built with speed or triple attack. |
| Light Inugami (Belladeon) | 3 | Support | Swift + Energy (SPD/HP%/HP%) Swift + Focus (SPD/HP%/ACC%) | Secret Dungeon L&D Scroll | One of the best support monsters, Belladeon shines in Arena Defense, TOA, Dragons, and Giants. |
| Light Bearman (Ahman) | 3 | Support | Blade + Energy (HP%/C.R%/HP%) Violent + Energy (HP%/C.R%/HP%) | Secret Dungeon L&D Scroll | A top healer, Ahman is useful in Dungeons, Arena Defense, Giants, and Dragons. |
| Fire High Elemental (Khali) | 3 | Attack | Fatal + Energy/Blade (Attk/Atk%/Atk%) | Uncommon Scroll Mystical Scroll Faimon | A powerful attacker, Roaq is useful everywhere and can even solo dungeons when built with Vampire Runes. Can be built with speed. |
| Wind Living Armor (Copper) | 3 | Defense | Guard (DEF%/DEF%/DEF%) Vampire + Guard (DEF%/DEF%/DEF%) | Uncommon Scroll Mystical Scroll | With strong attack and high defense, Copper can easily do over 20k damage and can solo B10 dragons in Vampire build. |
| Water Lizardman (Kernodon) | 3 | Defense | Guard (DEF%/DEF%/DEF%) Violent + Guard (DEF%/DEF%/DEF%) | Uncommon Scroll Mystical Scroll Mt. Runar | With ridiculously high defense, this monster can survive almost anything while his DOTS make him great for Dragons and Giants. |
| Wind Lizardman (Velfinodon) | 3 | Defense | Guard (DEF%/DEF%/DEF%) Violent + Guard (DEF%/DEF%/DEF%) | Uncommon Scroll Mystical Scroll | Like Kernodon but with a revenge passive skill. |
| Light Harpu (Sia) | 3 | Attack | Swift + Energy (SPD/HP%/HP%) Swift + Focus (SPD/HP%/ACC%) | Secret Dungeon L&D Scroll | A more PVP or ToA/Necro oriented monster, Sia is particularly useful due to her ability to set a teams attack bar to 0. |
| Light Fairy (Neal) | 3 | Support | Fatal + Energy (ATK%,ATK%,/ATK%) | Secret Dungeon L&D Scroll | Her strong heals and invincibility make Neal great for Giants. |
| Light Werewolf (Eshir) | 3 | Support | Energy (HP%/HP%/HP%) Energy + Violent (HP%/HP%/HP%) | L & D Scroll | With beneficial removal, multiple hits, heal block, and heal plus speed buff, Eshir is one of the top PVP and PVE 3* monsters used end game. |
| Water Werewolf (Vigor) | 3 | Support | Energy (HP%/HP%/HP%) Energy + Violent (HP%/HP%/HP%) | Uncommon Scroll Mystical Scroll Secret Dungeon | With heal block, party heal, and speed buff, Vigor is a bit of a "discount" Eshir, working as an excellent secondary healer or speed buffer. |
| Wind Epikon Priest (Michelle) | 3 | Support | Energy (HP%/HP%/HP%) Energy + Endure (HP%/HP%/HP%) | Uncommon Scroll Mystical Scroll | With revive, block flow, and multi-heal, Michelle is one of the less appreciated but useful revivers that can be a staple in ToA 100 teams as well as early Giants teams. |
| Water Epikon Priest (Rina) | 3 | Support | Energy (HP%/HP%/HP%) Energy + Endure (HP%/HP%/HP%) | Uncommon Scroll Mystical Scroll | Mana shield and HP based attacks makes Rina an excellent tank. Build with resist substats to get 100% resist and she's great early Arena Defense. |
| Fire Elven Archer (Adrian) | 3 | Support | Swift + Energy (SPD/HP%/HP%) Swift + Blade (SPD/CR%/HP%) | Uncommon Scroll Mystical Scroll | Used mostly for his crit damage and speed buff, Adrian is a staple of Necro teams as well as PVP support. |
| Wind Penguin (Mav) | 3 | Support | Swift + Energy (SPD/HP%/HP%) Violent + Energy (SPD/HP%/HP%) | Uncommon Scroll Mystical Scroll | One of the only monsters capable of reducing skill cooldowns, Mav is excellent support in ToA, arena, and Giants teams. |
| Water Mammoth (Talc) | 3 | Support | Swift + Energy (HP%/HP%/HP%) Violent + Energy (SPD/HP%/HP%) | Uncommon Scroll Mystical Scroll | With provoke, AOE defense buff and heal, and self-damage reduction, Talc is excellent support end game and early game. |
| Dark Mammoth (Basalt) | 3 | Support | Swift + Energy (HP%/DEF%/HP%) Violent + Energy (SPD/DEF%/HP%) | L & D Scroll | One of the ToA and ToA hard must-haves, Basalt's provoke, AOE attack bar decrease, and defense buff and heal make him an invaluable addition to the team. |
| Water Frankenstein (Tractor) | 3 | Defense | Guard x3 (DEF%/DEF%/DEF%) Vampire + Guard (DEF%/DEF%/DEF%) | Uncommon Scroll Mystical Scroll | A one-man army, Tractor's inability to receive defense debuffs makes him ridiculously powerful when built vampire with lots of def and lots of speed. |
You can also see it in picture form here:

Note: Basalt may be built with any combination of DEF and HP.
For a full list of secret dungeons available see:
All About Runes [A31]
So now that you know what to keep, let's see about getting them runes to make them truly shine!
Whether you’ve been lucky enough to summon an Occult Girl or are stuck with a lowly Golem, you won’t last long without good runes.
If you did the tutorial or read the in-game Help section, you should know where to get runes, but since most people don’t you can get the summary below.
For More on Runes See: http://summonerswar.wikia.com/wiki/Runes
Where to Find Runes
In addition to their native dungeons (like Garen Forest or Vografus), runes can be found in Shops or in Cairos in the following:
Giants: Despair, Energy, Fatal, Blade, Swift
Dragons: Violent, Focus, Guard, Endure, Shield, Revenge
Necropolis: Rage, Will, Nemesis, Vampire, Destroy
Where to Get 4*, 5*, and 6* Runes:
4* Runes- B2 and Up Giants, Dragons, or Necro; Hard Mode Boss, Hell Mode Stage
5* Runes –B5 and Up of Giants, Dragons, or Necro;; Hell Mode Boss of their native dungeon
6* Runes – B6 and Up Giants, Dragons, or Necro
Any- Randomly in Magic Shop; the rune grades you see will increase as you level.
Update: You will also now get a set of 4* and 5* runes as an accomplishment reward once. Keep them as they seem to be exactly the right slot values you need in the right set from what I’ve seen.
Rune Slots
You’ll notice when placing runes that they’ll have a number in brackets after the name and that your monster’s slots also have numbers. These correspond to the slot. So Fatal Rune (1) goes in slot 1, Swift Rune (2) goes in slot 2, and so on. Capiche?
Slots 1, 3, and 5 are always Flat and Static. That means they never have a % version and always are Slot 1 +Attack , Slot 3 +Defense, and Slot 5 +HP.
Slots 2, 4, and 6 are Dynamic and can be any either + or % and can all be HP, Attk, or Def. The exception is Speed which is always slot 2 and flat, Crit Rate & Damage% which is always slot 4, and ACC% which always slot 6.
Rune Stats & Upgrading
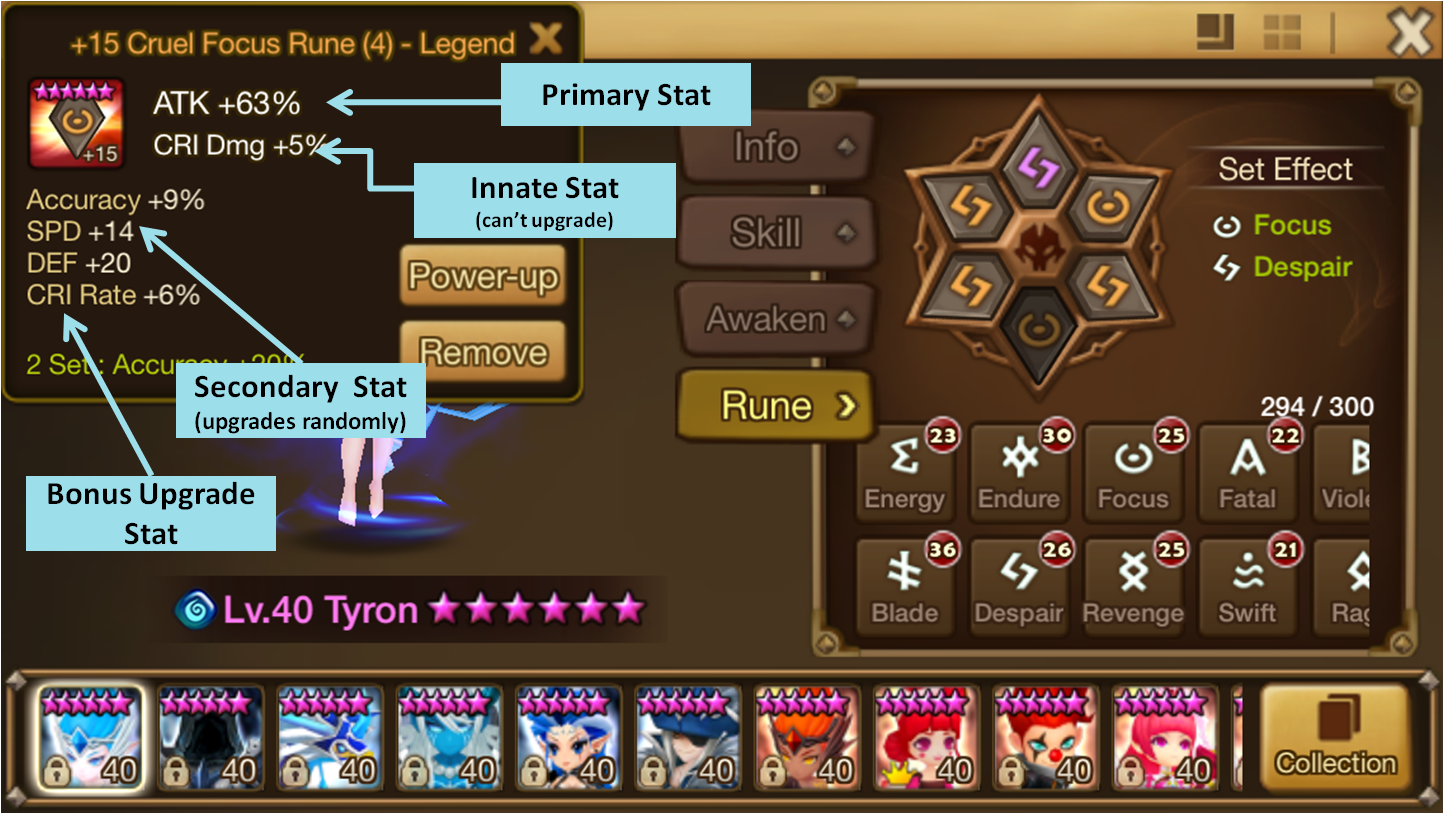
Runes have two types of stats, Primary Stats which increase each time you level up a rune, and Sub Stats that level up at every 3 successful upgrades.
When you looked at Rune builds, they’re talking about Primary Stats.
When you looked at Rune builds, they’re talking about Primary Stats.
Sub Stats are more advanced, so I won’t go in depth here, but they work like this:
Say you have a Magical Rune (the Green Runes) that has never been upgraded. It’s a Slot 2 %ATTK (the Primary stat), but in small letters it has SPD +2 and HP +5%.
When you upgrade the rune to +3, the HP +5% will increase by a random value, at +6 it will increase again, and at +9 through +15 you’ll get new sub-stats added every 3 upgrades.
Upgrading runes is a risky business and it’s not suggested that you Upgrade 4* runes past +9 as you’ll soon be replacing them!
As a rule of thumb:
A 1* rune at + 15 is the same as a 2* rune at +9, a 2* rune at +15 is the same as a 3* rune at +6, and so on. The exception is 5* and 6* runes which are very close in stats.


Fodder Leveling (Aka. How Do I Level Up Fast?) [A41]
At lower levels, you probably end up stuck leveling in the Hard mode of dungeons. If you cannot do Hard mode at all you shouldn’t be worrying about this.
1st Tip: Get a higher level friend. Friend monsters don’t receive any exp and stronger monsters will let you reach new areas faster.
2nd Tip: Do the hardest level dungeon you can solo and bring your fodder monsters along for the ride. At lower levels Water Epikon Priest will be your best friend.
3rd Tip: Once you have a solid 5* team, you’ll want to invest in 2x EXP whenever you’ve got a good number of monsters to level and plenty of stored energy.
4th Tip: Be friends with the big, blue Giant. Starting with B3, you’ll be able to get 4* runes at random, but B5 will more consistently drop 4* and 5* runes.
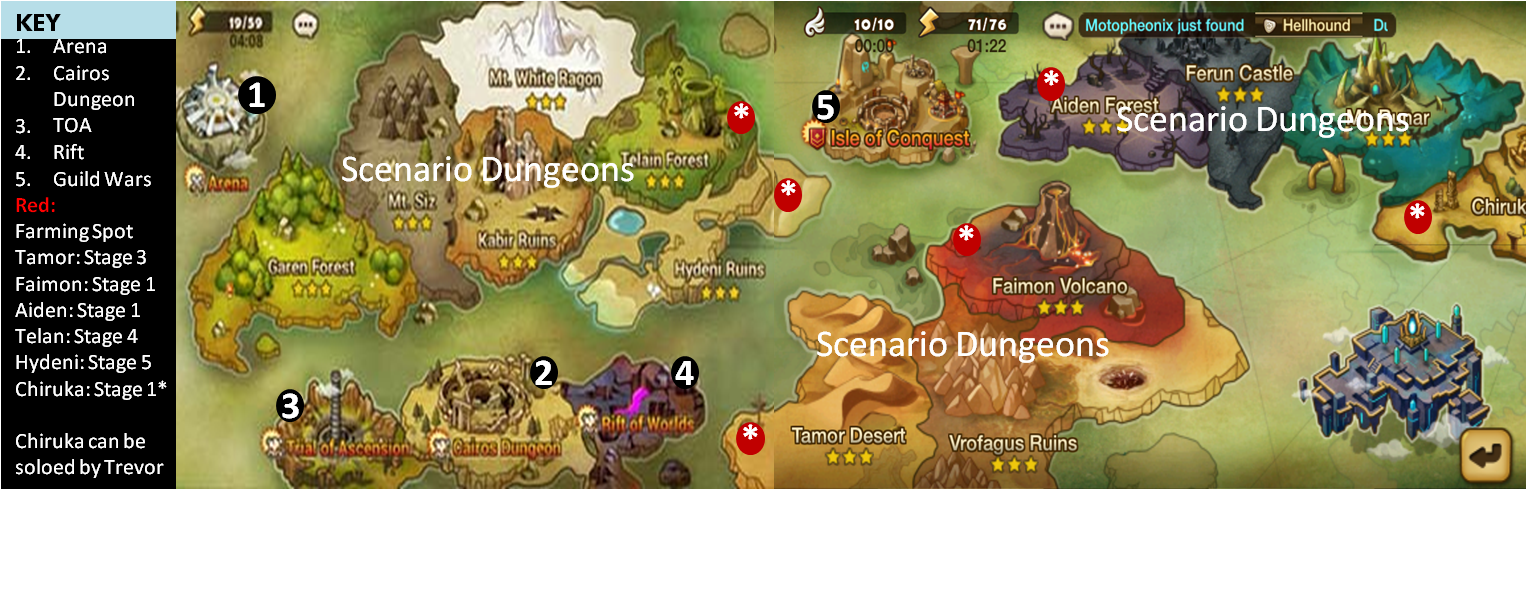
Where Should I Level? [A42]
As a rule the following places give relatively the same exp per energy in Hard and Hell Modes:
Garen Forest and Mt. Siz (2300 exp in Hard; 4800 exp in Hell)
Kabir Ruins, Mt. White Ragon and Telan Forest (3400 exp in Hard; 6000 exp in Hell)
Hydeni Ruins, Tamor Desert, and Vofragus Ruins (4300 exp in Hard; 7200 in Hell)
Faimon Volcano and Aiden Forest (4800 exp in Hard; 5100 exp in Hell)
For More Info Check Out: http://summonerswar.wikia.com/wiki/Scenario
Some prime leveling spots in each are:
Garen Forest Hell Stage 3 and 4 – 3 is easily soloed by fire monsters like Iselia; 4 can be soloed by Rina or Elucia.
Mt. Siz Hell Stage 2 and 5 – Strong water or fire monsters can solo these stages.
Mt. White Ragon Hell Stage 1 – The Warbears and Harpu can be annoying at lower levels; at higher levels go for the Harpu to avoid the healing cycles with Warbear.
Kabir Hell Stage 4 and 5- 4 is slightly easier, but any strong fire monster should be ok. Avoid the floors with Harpies.
Telan Hell Forest- Anywhere. Depending on your team any of these stages can be easy.
Hydeni Ruins Hell Stage 5- Easily soloable by a good wind monsters or 2 of strong water. Unlike other stages it lacks the more annoying Howls and dangerous High Elementals.
Tamor Hell Stage 3 – Solo-able by 5* Rina or any strong AOE water monsters (preferably built with despair), this stage will give you 7200 exp per run and likely rain Wind Griffins down too.
Vofragus Hell Stage 3 or 4- Not easily soloable, this stage will require 2 strong fire or water monsters to get through. It has the perk of dropping Fire Werewolf and Fire High Elemental.
Faimon Hell Stage 1: Unless you’ve been blessed with Ariel, you won’t be soloing this stage, but two 6* water monsters can finish this stage quickly and bring two fodder for the ride.
How Do I Gain Player Levels?
Player levels are easy to gain and will come naturally as you progress into the game. If you want to raise your player level fast, just do any Hell mode dungeon for a few weeks.
Arena 101 [A51]
What is Arena?
The PVP component of this game, Arena is where players compete for Glory Points and prizes by defeating other players and increasing rank.
How It Works
Players are matched to other players based off Match Points. Players new to arena or playing after reset all will begin with 1000 match points and can earn more by attacking other players and winning.
Using Arena Invites, players can attack other players' Arena Defense (AD) to gain Glory Points and rise in rank. Consecutive wins result in more glory points and bonus buffs, while winning over higher ranked players result in more Match Points.
Ranks
Ranging from lowly Beginner to the coveted Legendary Rank, players can earn crystals and monsters by attaining certain arena ranks. Rewards can be seen by clicking the Rewards button in the Arena Menu.
Glory Points
Glory Points are a special type of currency allowing players to purchase weekly prizes such as Elemental Scrolls, Devilmon, Angemon, and special buildings such as the Sanctum of Energy.
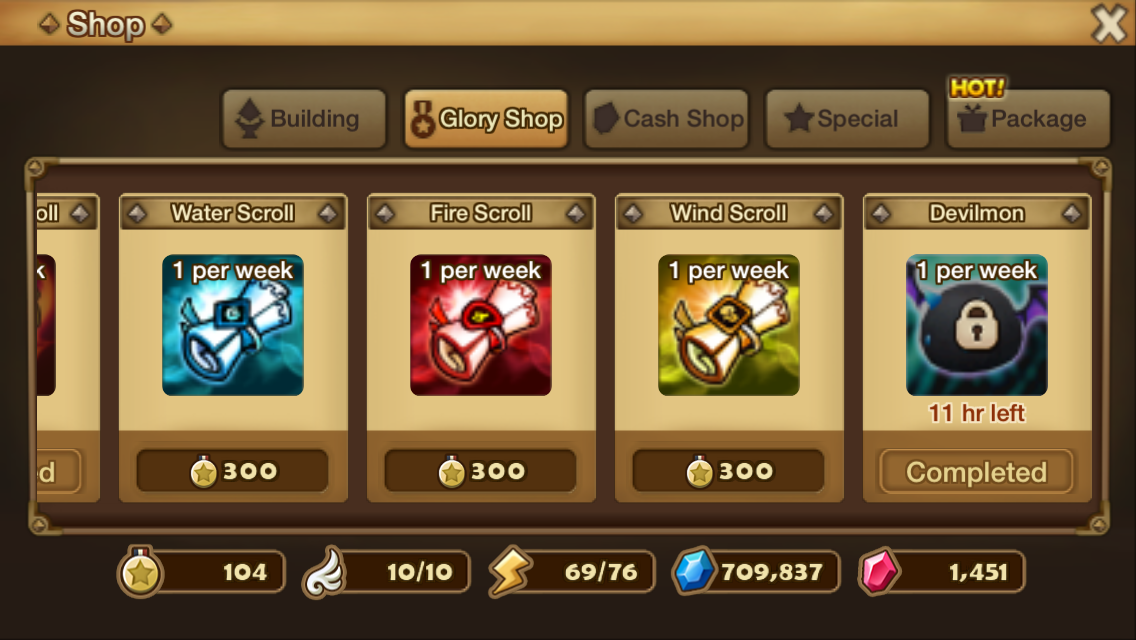 |
| Arena Shop |
What to Use Your Glory Points On?
Glory Point should always be used to purchase a Devilmon each week. Once that is done you should invest in buildings such as Mysterious Plant and Sanctum of Energy, though you may also use points for Mystical or Element Scrolls until you get your first set of solid 3* and possibly a 4*.
Overall it is recommended you spend Glory on the following in the following order of importance:
Devilmon
Mysterious Plant (Strange Plant)
Sanctum of Energy
Sky Tribe TotemCrystal Altar
Fallen Ancient Guardian
Ancient Sword
Guardstone
Various Element Sanctuaries
Everything else.
Special Note:
Any buildings purchased with Glory Points will apply a universal buff to all your monsters. That means if your 14% HP buff from Crystal Altar works for all your monsters everywhere.
For more on buildings see here: http://summonerswar.wikia.com/wiki/Buildings
Glory Shop Guide Here
 |
| Example of Building Buffs in HOH |
What Should My Arena Team Be? [A52]
 |
| Example of End Game Arena Offense |
There are three primary strategies in Arena and numerous hybrids. They are:
- Nuke – High attack (and at later levels, high speed) teams meant to destroy your enemy in 1-2 turns.
- Tank – High Defense or HP teams meant to outlast your opponent (often relies on towers or dots to kill).
- Crowd-Control (CC)– A team relying on CC abilities and debuffs to incapacitate your opponent.
- Balanced- Team containing one nuker, Crowd-control attacker, or Dot attacker and a combination of support types such as healers, revivers, buffers, and debuffers.
Standard Team
At Early to Mid Game levels, your arena will likely be a hybrid capable of both attacking and defending.
Standard teams are generally comprised of buffers and healers, with one or more attackers.
Standard Team Structure:
Attack/Stat Buffer: Like Wind Pixie, Water M. Witch, Fire Hellhound, Wind B. Hunter, or Water Inferno
Speed Buffer*: Like Wind Griffin, Water M. Witch, Light Inugami, Water B. Hunter, or Light Viking
Attacker: Like Fire Inugami, Any High Elemental, Fire or Wind M. Archer
Healer: Like Water or Light Fairy or Light Inugami
*Speed buffer here is referencing true speed buffers like Wind Griffin and Fire High Elemental, as well as attack gauge increasers such as Water Mystic Witch Light Inugami, or Fire Vampire.
Variations:
Attack/Stat Buffer + Attacker x2 + Healer
Attack/Stat Buffer + Attacker + Healer + Defense
Main Rune Sets: Various
Lead Skills: Various
For more on Lead Skills See:
Nuke Team
More common in Mid to End-Game tier Arena, Nuke teams rely on high speed, high power tactics to annihilate opponents. As a result, Nuke teams are almost always lead by speed leaders and feature speed buffers as support while the remaining two slots are taken by high damage attackers. In most cases one or both attackers is an AOE monster and support types generally also have debuffs or buffs and may be both healers and buffers themselves (like Chasun).
Nuke Team Structure:
Speed Lead: Like Fire Amazon or Water Inugami (if you have a water based team)
Speed Buffer: Like Wind Griffin, Water M. Witch, Light Inugami, Water B. Hunter, or Light Viking
AOE Attacker: Like Fire Fairy , Fire Grim Reaper, Water or Wind Lizardman
Secondary Attacker: Like Fire Inugami, Any High Elemental, Fire or Wind M. Archer
Variations:
Speed Lead + Speed Buffer + AOE Attacker x2
Stat Buffer x2 + Attacker x2 (or AOE Attacker x2)
Speed Lead + Stat Buffer + AOE Attacker x2
Speed Buffer + Debuffer + AOE Attacker x2
Main Rune Sets: Fatal + Blade, Swift, Rage + Blade
Note: Rage sets are no longer available from Giants as of Fall 2015 but from Necropolis.
Lead Skills: Speed, Attack Boosts
CC Teams
CC teams, like Nuke teams, almost always require players to go first to succeed. As a result, they are often lead by speed leaders or contain monsters with naturally high speed that are built with swift runes and speed subs.
Crowd Controllers are typically AOE attackers built with Despair Focus runes and also include monsters capable of stunning, freezing, or causing sleep due to inherent skills.
CC Team Structure:
Speed Lead: Like Fire Amazon or Water Inugami (if you have a water based team)
Speed Buffer: Like Wind Griffin, Water M. Witch, Light Inugami, Water B. Hunter, or Light Viking
Stunner/Freezer: Like Fire Fairy or Water Amazon, or any AOE monster with Despair Runes
Attacker: Like Fire Inugami, Any High Elemental, Fire or Wind M. Archer
Lead Skills: Speed, Accuracy
Variations:
Speed Buffer or Speed Lead, + 2x Stunner/Freezer, +Healer
Speed Buffer or Speed Lead, + 2x Stunner/Freezer + Attacker
Main Rune Sets: Despair + Focus, Swift + Focus
Tank Teams
More geared towards Arena Defense, Tank teams are often comprised of Defense, Healers, and Buffers that increase Defense Stats and may or may not include a Primary Attacker. Tank teams are often lead by Speed, Defense, HP, or Resistance Leaders.
Tank Team Structure:
Healer: Like Light or Water Fairy, Water or Light Howl, Light Inugami, or Light Garuda
Defense*: Like Water Warbear, Fire Yeti, Light Vagabond, or Water Werewolf
Defensive Attacker: Like Wind Warbear, Wind Living Armor, or Wind or Water Lizard Man
Stat Buffer: Like Shannon, Fire Bounty Hunter
Variations:
Defense x2 + Healer x2
Defense x 2 + Healer + Attacker
Healer x2 + Attacker + Defense
Healer x 3 + Defensive Attacker
Lead Skills: Speed, Defense, HP, or Resistance Boost
*Defense here is defined as monsters either with naturally high defense and defense rune builds such as Wind Living Armor as well as monsters with naturally high HP or HP builds as many HP and Def builds will vary or be interchangeable (take note of skills though!).
Balanced Teams
In the past several months, numerous monsters have been added or had their skills re-tooled, changing the face of the game forever. As such, balanced teams have become much more common with monsters such as Fairy Queen, Magical Knight, and Elven Ranger being given away and monsters such as Penguin Knight being added.
Unlike the other teams, balanced teams rely on strategic knowledge of monster skills to create high synergy. As such, this sort of team doesn’t exactly fit a standard mold but relies on your creativity and experimentation to make it succeed.
Example Balanced Team Structure:
Supportive Nuker: Fire High Elemental
Secondary Nuker: Fire Taoist
Supportive Healer: Water Garuda
Offensive Healer: Water Werewolf
Getting Started With Guild War [A61]
It’s bloody, it’s vicious, it’s--- essentially arena for guilds.
Don’t let the name mislead you, while your guild is certainly a big part of winning the war, it’s up to you to win the battle and most of those newly minted arena skills will come in handy.
So, you ask, if it’s just like arena, why do I need to know more? Now hold your horse, that’s not what I said!
So what is the difference? To start:
Unlike arena, if your monsters die in battle, they’re gone permanently---or at least until the war ends. That means you can’t use that Shannon you lost to Guy X in a battle with Guy Y. Shannon is out for the count.
There are two phases to every battle in Guild Wars, but for each you can select only three monsters. Though this might not seem like a problem, it requires more skill and knowledge than arena to know what combinations of monsters and skills will work best.
While using a light fairy and a fire fairy is totally fine in Guild War, you’ll be stopped any time you try and run two of the same monster even if it’s in a different stage of battle. So don’t rely on using two of those fire Hellhounds to buff your team; you can only take one.
Yes, you need to trust your guild mates. Where before you could happily do your own thing, Guild War requires that all “Attackers” attack (and preferably win) and all “Defense” put up a defense. If you don’t collaborate you’re toast!
How Guild War Works
Every Sunday your Guild Leader will select attackers and defenders for your team. The leader will additionally get 12 Guild War Invites that they will use throughout the week to initiate battles. If you’re an attacker you attack whenever it’s battle-time, and if you’re a defender---well you just sit there and look (and act) deadly.
With luck, cooperation, and skill you’ll be able to win battles and earn yourself Guild War Points (GWP) that will let you buy fantastic prizes, and, if you’re Guild is especially powerful, climb up in rank and get a ton of Summon Stones.
Of course, if you’re new to the game (and don’t have any 6* monsters), you probably don’t want to (and probably shouldn’t) be competing for top spot in wars. Rather you should Guild War Point Farm.
What are Guild War Points and Guild War Point Farming? [A62]
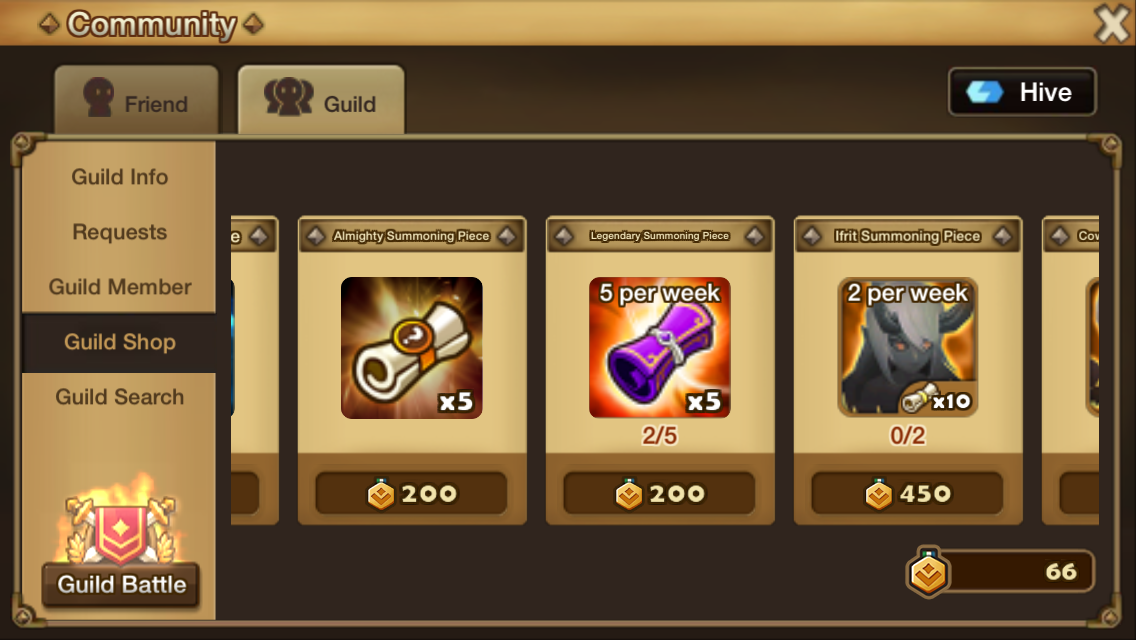
Guild War Points (GWP) – Points used in the Guild Shop (accessible via the community tab under your guild tab) to purchase prizes.
Some Fabulous Prizes Include:
4* Max Level Rainbowmon
The least expensive prize, you can purchase one of these per week and it is highly suggested you get this first as it will help you make your first 6* very, very fast.
Ifrit Summoning Pieces
Get 100 pieces to summon a random element 5* Ifrit. You get ten pieces at a time each for 450 points. Theomars and Tesarion in particular are extremely well used and extremely sought after. Definitely one of the first major GWP purchases you want to make.
Legendary Scroll Pieces
Another prize you should aim as your first or second use of mass GWP.
Mystical Scroll & Element Scrolls - This isn’t suggested until you have gotten your Ifrit and purchased your weekly Rainbowmon.
What is Guild War Point Farming?
A common tactic among lower and middle level guilds, GWP Farming like Arena farming is done by placing weak, easily beatable units as Defense and aiming to win easy battles amongst other Farming Guilds or Guilds with weaker members.
Contrary to what you might think, GWP Farming is highly useful and can get you anywhere from 300-1000 GWP a week making it highly profitable.
Why is Guild Ranking Better?
Long story short, it’s not. Your only benefit at this time for a high guild rank, is an increased number of Summoning Stones as a reward.
What are Summoning Stones?
A new alternative form of summoning, Summoning Stones give you a chance to receive any monster from that week’s exclusive list. Unfortunately summon rates are still the same and you are likely to get 3* from these---and yes duplicates!
As such, not many people care about Summoning Stones and most competitive guilds do so for enjoyment and not stones.
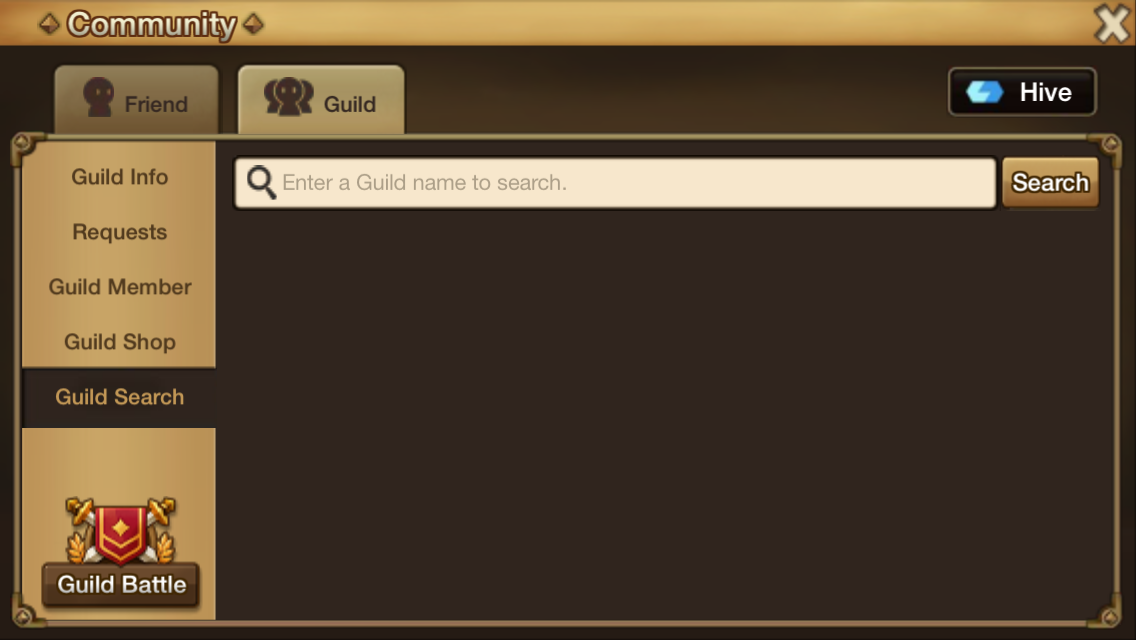 |
| Joining a guild is easy! Just go into the Community Tab and type in the name of the Guild you want to join! |
Giants, and Dragons, and Liches Oh My! [A71]
The Big Blue Giant
While I made this mostly for B10 teams, I've found that all Giants teams follow the same basic formula for success and what will change are:
- The elements of the monsters you are using
- The rune builds and upgrade levels you have access to and use
- How quickly you can beat the Giant.
Though you'll probably unlock stages in Giants by using "friend monsters" (and if you don't you should do this ASAP!), completing the stage yourself to grind requires a bit more strategy than that.
From B1-B4: Don't worry about teams too much, any decently runed monster with 3* runes will be able to do this so long as you have at least 1 healer and 1 DOT.
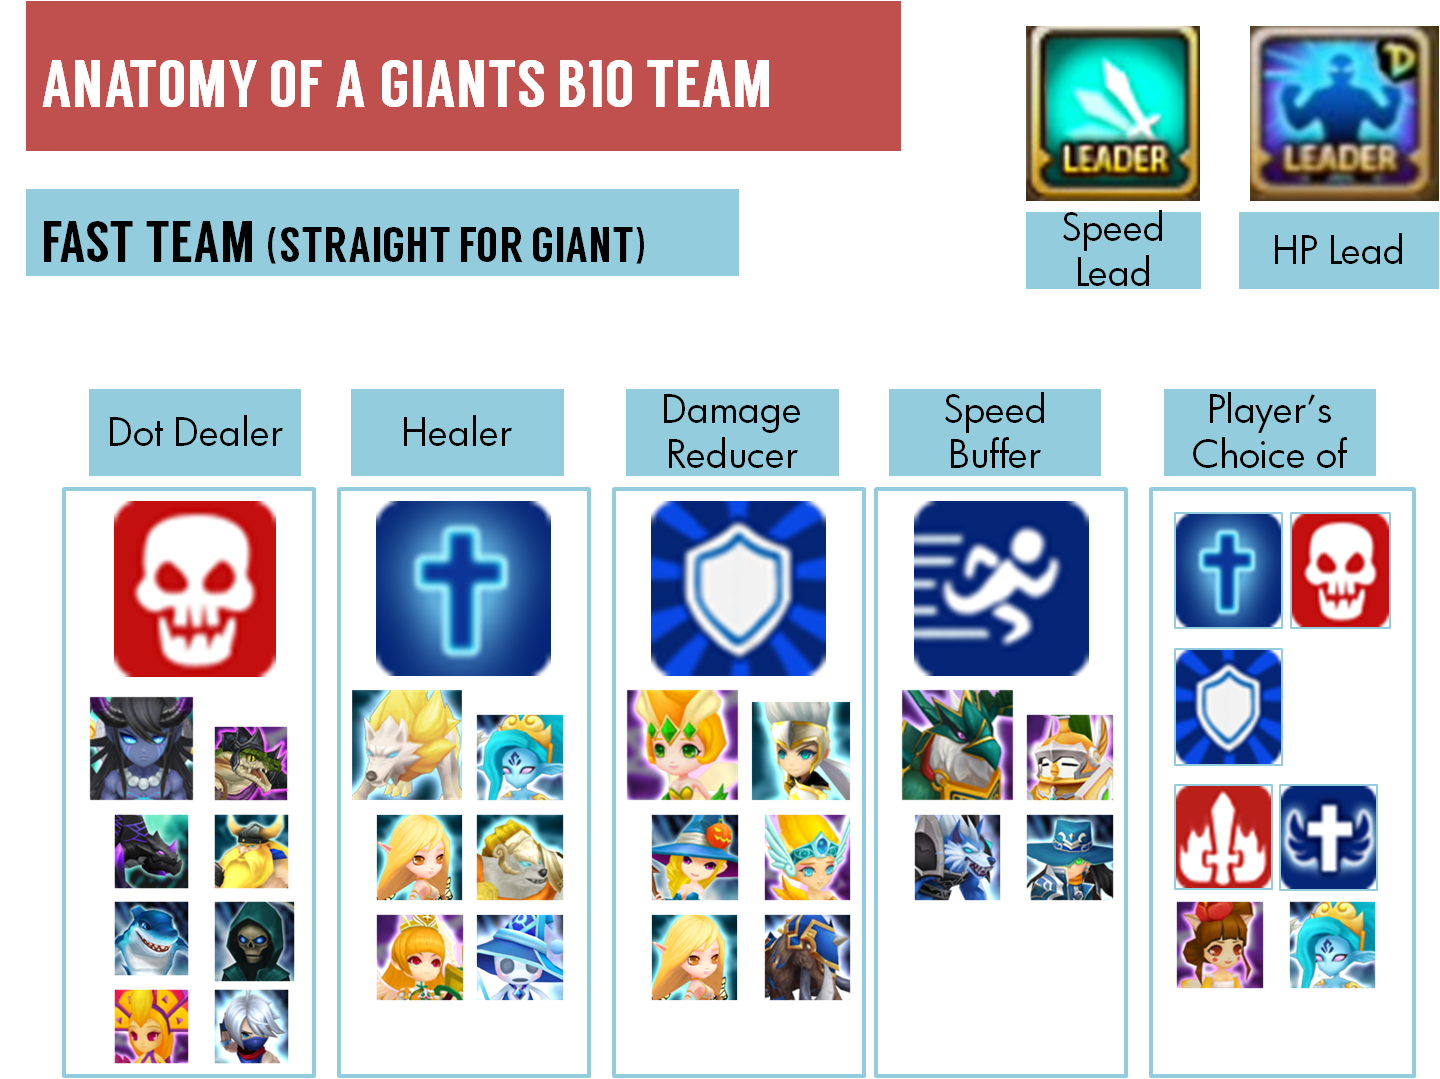
For B5: If you're building your own team, this will look a lot like a B10 team, so it's good to invest in the monsters for it! Composed of a either 1 or 2 Healers, 1 or 2 Support Buffers, a DOT, and a Speed Buffer (or another healer) this team will probably look like the following:
Healers: Water or Light Fairy, Epikon Priest (any), Water or Light Howl, or Water or Light Garuda
Supports/Buffers: Wind Pixie, Water Mystical Witch,
Speed Buffer: Wind Griffin, Wind Penguin, or Water Bounty Hunter
DOT/Damage: Wind or Water Lizardman, Water or Wind Shark, Wind or Water High Elemental
For B6-B9: This is pretty advanced stuff and you will probably be using the same formula as for B5 and B10 but switching in your best monsters for the elements that align for each giant. Unless you get Light Vagabond, Fire Epikon Priest, or a Wind Sylphid, you'll probably be going with 2 or more healers on the team and a dedicated DOT dealer like a Lizardman or Fire Sylph.
For B10: Stop reading this guide and go to the advanced section you nosy-nancy!

What a F2P Giants Team Looks Like
The Dastardly Dragon
Largely an end-game dungeons, you probably won't (and shouldn't) be farming dragons with any regularity until you can auto Giants B8 at minimum.
From B1-B4: Like with Giants, don't worry about teams too much, any decently runed monster with 3* runes will be able to do this so long as you have at least 1 healer, 1 DOT, and 1 cleanser such as Konamiya.
For B5 and Up: If you're building your own team, this will look a lot like the team below, though you likely won't have a reviver unless you chose to build Teon or Michelle. To do this you'll need 1 or 2 healers, a dedicated cleanser, and a combination or DOT dealers or damage reducers. If you have a rep such as Juno, she can often solo as long as you reach the boss stage.
Healers: Water or Light Fairy, Epikon Priest (any), Water or Light Howl, or Water or Light Garuda
Supports/Buffers: Wind Pixie, Water Mystical Witch, Wind Penguin Knight
Damage Reducer: Light Vagabond, Dark Death Knight, Wind Sylphid
DOT/Damage: Wind or Water Lizardman, Water or Wind Shark, Fire Sylph, Fire High Elemental
Cleanser: Water Garuda, Wind Mammoth, Fire Mystic Witch, Dark Bearman
Revivers: Light Garuda, Wind Epikon Priest, Light Pixie, Water Undine
Cleanser: Water Garuda, Wind Mammoth, Fire Mystic Witch, Dark Bearman
Revivers: Light Garuda, Wind Epikon Priest, Light Pixie, Water Undine
 |
| What F2P Initial Dragons Team Looks Like |
Domain of the Lich King (Necropolis)
Extremely end game, successfully completing the Necropolis will require several months of farming Dragons as all your units should be Violent Revenge with great stats.
However, rune's are not enough to beat the fearsome Lich King, a need for precise strategy and synergy make this one of the most difficult dungeons to auto in the game and one even senior end-game players have difficulty facing.
Below is an overview of what a Necropolis Team can theoretically look like; however most F2P combinations have not been tested sufficiently or have not been very successful to date.
The basic strategy requires a total of 6 hits to be performed by your first two monsters within the 1st two turns. After that the slow debuff and heal block must be applied, followed last by copious DOT or damage, requiring exact timing to successfully perform on auto and pretty good AI on the part of your monsters. To compensate for AI issues and lack of violent Proc, all units should have attacks that deal 2 or more hits, with the main 2 shield-breakers dealing 3 or more.
Monsters in the team, however, cannot be too strong or difficult to kill as both lead to instant failure, but nor can they be so weak they cannot survive the exponentially devastating hits of the Lich King and your stolen monster.
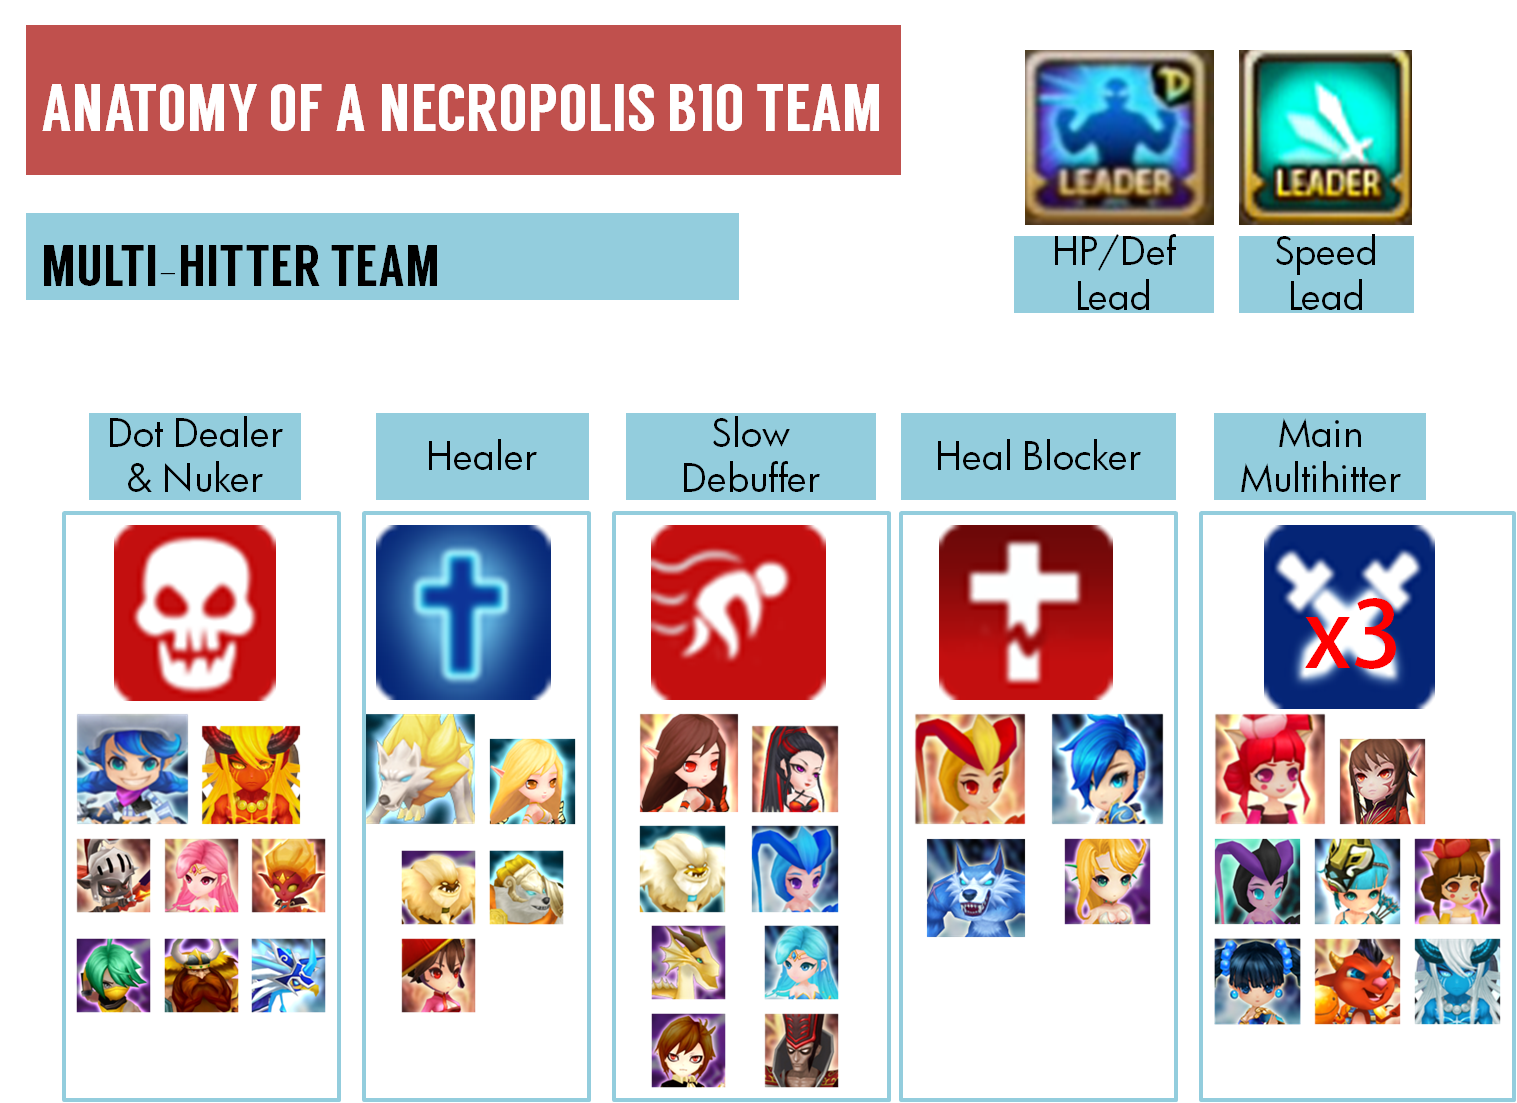 |
| Example of Monsters Suitable for a Necropolis Team |
Intro to ToA and Rift Raids [A80]
Tower of Ascension
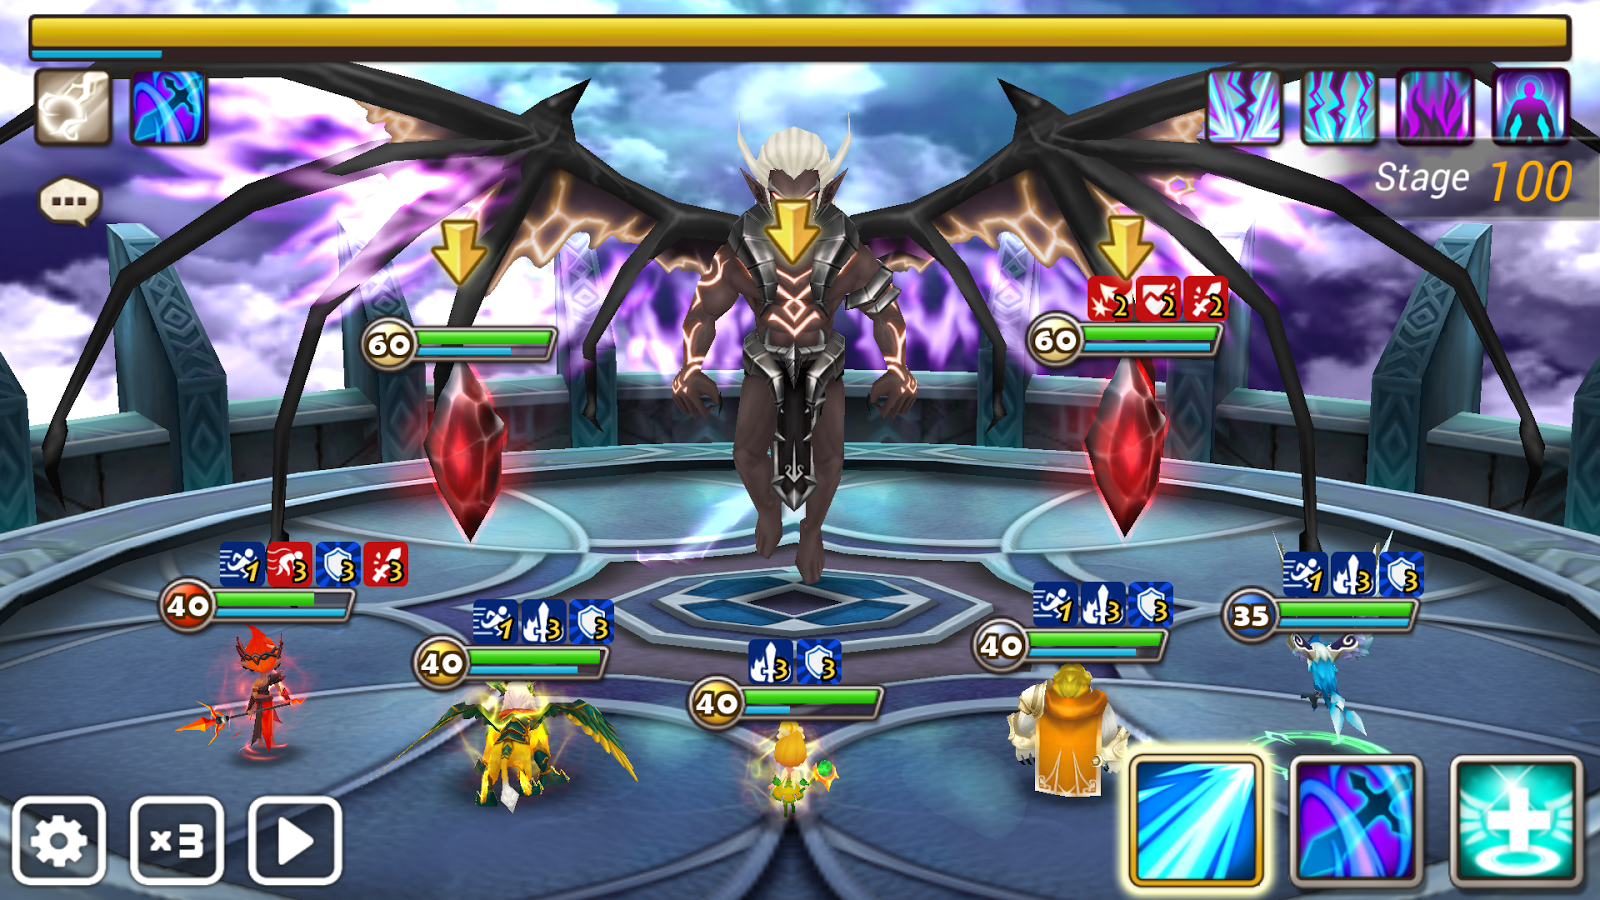 |
| Example of Toa 100 Farmable Team |
What is ToA?
The Tower of Ascension (ToA) is one of the game-changing additions to Summoner's War that has made the game both more challenging and substantially easier. Resetting once a month, ToA allows you to climb its 100 floors to get various rewards.
ToA has two difficulties: Normal and Hard. Beyond the expected differences (as in Hard is hard), ToA hard has the additional stipulation that two of the same monster cannot be used. That means you unfortunately can't rock your dual Baretta wielding skills in hard, but you can in normal.
ToA has two difficulties: Normal and Hard. Beyond the expected differences (as in Hard is hard), ToA hard has the additional stipulation that two of the same monster cannot be used. That means you unfortunately can't rock your dual Baretta wielding skills in hard, but you can in normal.
It is unlocked only once all scenario dungeons have been completed and after reaching at least level 16 when an additional quest will pop up. ToA is certainly end-game content, but even new and lower-level users can benefit from the various rewards. Two bosses exist (Atharos and Lyrith) which switch month to month.
For more on TOA and a full list of rewards see: http://summonerswar.wikia.com/wiki/Trial_of_Ascension
ToA Strategy
Early on you will likely flounder through the first 10 stages of Normal and Hard Modes, earning 50 energy each for your troubles, at slightly higher levels (or once you fuse Fire Sylph or have a few solid 6*) you will likely be able to climb to 30 or 40, earning the rewards there. Strategy at early floors is fairly simple and relies upon multiple AOE stun (despair rocks), AOE Dots (hint Fire Sylph Baretta), and a combination of healers to keep enemies from hitting you and surviving the few lucky hits.
 |
| Semi-Farmable Toa 60 Hard Team Example |
Teams for Toa will often include the following farmable monsters:
Fire Sylph (Baretta) - Build Despair Focus (or Revenge) (Spd/HP%/ACC%)
Fire Joker (Jojo) - Build Fatal Focus or Despair Focus (Attk% x3)
Light Inugami (Belladeon) - Swift Energy/Focus or Violent Energy/Revenge (SPD/HP%/HP%)
Wind Pixie (Shannon) -Despair Focus/Energy (SPD/HP%/HP%)
Fire Griffin (Spectra) - Swift Focus (SPD/HP%/ACC%)
Dark Ifrit (Veromos ) - Swift Energy or Violent Energy (SPD/HP%/HP%)
Water Garuda (Konamiya) - Swift Energy or Violent Energy (SPD/HP%/HP%)
Wind Griffin (Bernard) -Swift Energy (SPD/HP%/HP%)
Wind Penguin Knight (Mav) - Violent Energy (SPD/HP%/HP%)
Dark Mammoth (Basalt) - Violent Energy (SPD/DEF%/HP%) or (DEF%, DEF%, HP%)
You will notice that here Veromos, Baretta, Shannon, and even Jojo act as CC by stunning or killing with DOTs and Bombs, Spectra, in contrast reduces Attack Bars when enemies aren't stunned, and Belladeon keeps everyone alive. This strategy works for most floors of Toa with exception to boss stages which will vary.
The main idea is to get 2-3 AOE stunners (Veromos, Baretta, Shannon) plus 2-3 support that will either keep you alive via healing, speed buffs, cleansing, or reviving, or keep your enemy from hitting you by reducing their Attack Bar.
Since this is largely end-game content, I won't go into more but if interested you can find more information from the following guides. YouTube videos, as always, are the premier source of guides for specific boss strategies.
Video Tutorial 1-100: http://appinvasion.com/threads/strategy-for-trial-of-ascension-tower-up-to-floor-100-final-boss-spoiler-alert.201019/

Leveling Guide [A81]
Though your path will be your own and circumstances will widely differ, my goal here is to provide you with a bit of a roadmap to help gauge where you are and where you should be in terms of progressing in the game. As such, this will be short and sweet.
Level 1-10
Newly fledged, if you’re reading this guide now, you are in a great spot! Your focus here should be to experiment and learn how the game works and how it fits your play style.
Some Goals/Milestones:
1. Completing Dailies
2. Getting your Elven Ranger (yes he’s good, so don’t eat him!)
3. Adding Runes to your team
4. Exploring Arena & Setting up your Arena Defense
5. Making your first set of 3*
6. Getting your first Mystical Scrolls with Crystals (save premium pack for higher levels if you don’t get any mystic scrolls from events or arena).
Level 10-20
By now you should have a good grasp on the basic mechanics of the game. Your monsters probably have 2* and 3* runes, and your primary team is likely composed of a few support types and one or two primary attackers. You’ve probably completed most of the normal mode scenario dungeons, but may still be struggling with Faimon.
Some Goals/Milestones:
1. Defeating Mt. Sitz (Getting Lapis the Water Magical Knight and building her)
2. Farming Giants B2-B4 to get your main 5 monsters all wearing 3* runes or higher.
3. Upgrading those 3* Runes to +6 or +9 (make sure you are using % in 2,4, 6 slots!)
4. Joining a GWP Farming Guild (Start getting those Rainbowmon or Mystical Scrolls!)
5. Making your first 4* or 5* (this should only be happening at the higher end of the spectrum and only after you have your monsters Runed correctly; you should not be eating any 4* summons to make your 5*)
6. Defeating Faimon Normal and Unlocking ToA
7. Awakening your monsters.
Level 20-30
By this point you’re starting to hit early to mid level game. Those on the lower end of this level range should have a solid team of 4* with 3* minimum runes and should have invested in some of the Top 2* and 3* (see section A21). Those on the higher end of this level range, should have at least 1 5* monster and be moving up to 4* and 5* rune sets for your primary teams.
Getting better runes and starting to climb Giants, Dragons, and even Necro should be your focus, as well as getting a team together so that you can do the next or current month’s HOH.
Some Goals/Milestones:
1. Defeating first 2-3 stages of Giants, Dragons, and Necropolis.
2. Climbing ToA normal and hard to the highest level you can
3. Getting your first premium pack.
4. Getting Shannon, Bernard, and Konamiya to level 30 if you haven’t already.
5. Leveling your 4* monsters.
6. Building a team that can beat B5 Giants team (example: Elucia, Shannon, Bernard, Lapis/Lucian, Konamiya or Healer x2 + Support x2 + 1 Attacker OR Healer x 1 + Support x1 + Attack x2)
7. Exchanging 3* rune sets for 4* rune sets (don’t upgrade past +9)
8. Making your first 5* monster (preferably a farmer or strong attacker)
9. Farming Hell Mode in any Scenario with your 5* monster and fodder leveling.
10. Exchanging 4* rune sets for 5* rune sets.
11. Upgrading those runes.
Level 30-40
This is really getting to mid-end game stuff, so at this point you’re fairly comfortable with the game, and if you did everything I suggested, you’ll probably be spitting out 6* monsters every 1-2 months by the time you are 40. You’ll also likely have your main teams all wearing spiffy 5* runes with your most used attackers and healers sporting the rare 6*.
Some Goals/Milestones:
1. Climbing past Giants B5.
2. Making your 1st 6* monster (if you joined a GWP farming guild, you should be good by this point)
3. Getting your Ifrit (if you joined a GWP farming guild and it’s been three months of farming, you should be ok, otherwise, don’t worry about it)
4. Getting Bella or another AOE healer if you don’t have one.
5. Fusing Veromos (you don’t NEED him, but he helps tremendously everywhere)
6. Building a better Arena Offense and Defense Team.
7. Building a Giants B10 team (you can do this with only 1 6* monster and a 5* Shannon, Bernard, and Bella as long as you have an HP leader like Veromos or Water Lich/Vampire)
8. Exchanging 5* runes for 6* runes.
9. Starting to work on Dragons & Necro Teams.
Frequently Asked Questions (FAQ) [A90]
How Do I Fight Friends?
It’s fight with friends. When selecting monsters for a dungeon you should see a set of monsters on the bottom left, select one of them and add it to your team.
What happens if I feed Angemon to Angemon?
You lose an Angemon. To correctly use Angemon, level it to 15 then awaken it and feed it to a monster of the same element.
How Should I Use Devilmon?
Due to their rarity, Devilmon should only be used on 4 or 5 Star Natural monsters, and then, only on the ones you are sure you will use often.
How do I use Rainbowmon?
You evolve rainbowmon to the next level (they come maxed) then use it to evolve another monster.
How do I increase skills?
You can increase skills by:
- Feeding a monster another monster of the same unawakened name (ie. Feeding Wind Fairy to Neal).
- Feeding a Devilmon to a monster (recommended only for 4* natural monsters).
Does it take more materials to evolve an awakened monster versus an unawakened?
No, Awakening cost doesn’t change.
Can I evolve a monster if I awakened it?
Yes, you can evolve or awaken in any order; it has no impact.
Can I evolve a silver star monster?
Yes, silver star monsters can be maxed to 6* but cannot be awakened
Where do I get Mystical Scrolls?
Premium Packs, Starter Packs, Glory Points, Mission Rewards, Random Drops from B4+ Dungeons, Shop, Events, and with cold, hard cash.
How do I get a 4* or 5* monster?
Pray, pay, or fuse.
What Monster Should I Evolve?
As a rule, you should evolve your top, most used attackers first, then evolve support. The exception is if you summon a 4* or 5* as most of these monsters will help you progress quickly.
What Should I spend my Crystals on?
If you have no 3* monsters; it’s recommended to spend your first 300 crystals on a summoner’s pack. After that you can upgrade your Shop or save for Premium Packs. Once you can solo hell mode of any scenario, you can start spending on Double Exp.
What should I spend my Glory Points on as a newbie?
Devilmon—even if you can’t use it, get one and save it.
Strange Plant- You’ll appreciate the fast energy regain.
Sanctum of Energy, Totem, and Towers are more advanced choices once you start becoming more competitive in arena.
very nice info . :)
ReplyDeleteIm lvl 23 i have an awakend fire toaist 4* a fire slyph 4* water knight 4* mao 4* nubia 4* decamaron 4* shannon 4* bernard 4* awakened water vagabond 4* rakaya 4* konamiya 4* who should i evolve since i have only 4 angelmons only? Plus i have a 5* chris. Thanks in advance
ReplyDeletevery very very good,
ReplyDeleteand good information
.can you find any this translate in german ?. google translate it but craps
Amazing gacha games.
ReplyDeletegacha lovers
game lovers
gacha game player
amazing gacha partner
play gachalife